
How to Hardwire Your VUEROID S1 Dash Cam for Reliable Parking Mode
**Installation Recommendation: For the safest and most reliable installation, VUEROID recommends having the hardwire kit installed by a qualified professional.
Hardwiring your VUEROID S1 is the best way to unlock advanced features like Parking Mode and Extreme Low Power Mode (ELPM). Unlike using a cigarette lighter power adapter, a hardwired installation allows the dash cam to automatically switch between driving mode and parking mode based on your vehicle’s ignition status.
This guide walks you through the complete installation process, including cable routing, identifying the correct ACC and BAT fuse locations, and verifying that Parking Mode is working properly.
Disclaimer: Professional installation is recommended. If you choose to install the dash cam yourself, please follow all safety precautions. VUEROID is not responsible for any damage or injury resulting from improper installation.
What You’ll Need
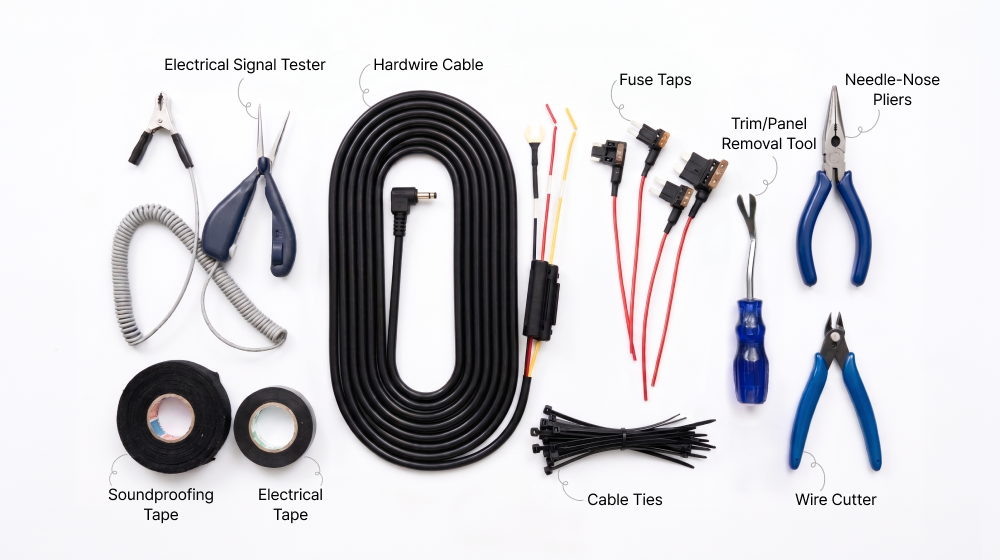
Prepare the following tools before you begin:
- VUEROID S1 Hardwire Kit
- Fuse Tap Adapters (compatible with your vehicle)
- Electrical Signal Tester (Test Light)
- Wire Cutter
- Needle-Nose Pliers
- Trim/Panel Removal Tool
- Cable Ties
- Electrical Tape
- Soundproofing Tape (Optional)
*Ensure you purchase the correct type of fuse tap for your vehicle, as they vary.
Step 1. Install and Route the Dash Cam Cables
Start by routing the rear camera cable through your vehicle’s interior trim.
- Remove the necessary trim panels using a panel removal tool.
- Route the rear camera cable along the factory wiring.
- Mount the rear camera as close to the center of the rear window as possible.
- Connect the rear camera cable and secure the connector with electrical tape to prevent vibration.
- Connect the power cable, rear camera cable, and interior camera cable (if equipped) to the main unit.
- Temporarily position the front camera to confirm the required cable length before permanently mounting it.
- Use cable ties to organize the wiring as you work.
Safety Tip: When routing cables around the A-pillar, always place the dash cam cable behind the vehicle’s airbag wiring. Never install cables in front of an airbag, as this may interfere with airbag deployment during an accident.
Step 2. Locate the Vehicle’s Fuse Box
The fuse box is usually located beneath the driver’s side dashboard, although its location varies by vehicle.
Use one of the following references to identify the fuse layout:
- The fuse box cover diagram
- Your vehicle owner’s manual
For dash cam installation, fuse circuits rated 10A or higher are generally recommended.
Step 3. Understand the Hardwire Cable
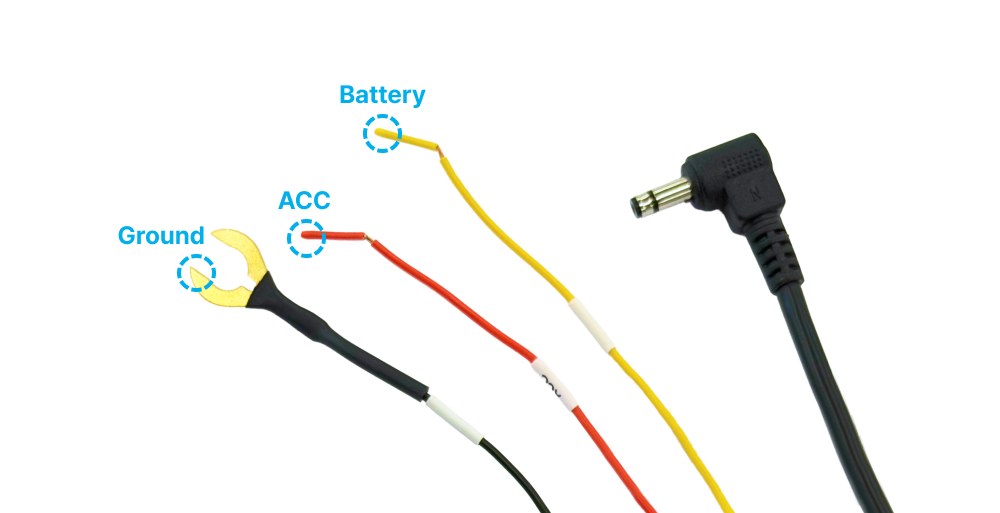
The VUEROID S1 Hardwire Kit includes three wires:
Attach the Black (GND) wire securely to an unpainted metal bolt or factory grounding point near the fuse box.
Step 4. Identify the Correct ACC and BAT Fuses
Using an electrical signal tester, identify the correct fuse locations before connecting the hardwire kit.
Find the ACC Fuse
- Turn the vehicle’s ignition ON.
- Test the available fuse slots.
- Locate a fuse that receives power only when the ignition is ON.
- This fuse will be used for the Red (ACC) wire.
Find the BAT Fuse
- Turn the ignition OFF.
- Wait several minutes, as some vehicles continue supplying ACC power temporarily.
- Test the fuse slots again.
- Locate a fuse that continues to receive power even with the ignition turned off.
- This fuse will be used for the Yellow (BAT) wire.
Once you’ve identified both fuse locations, you’re ready to install the fuse taps.
Step 5. Prepare and Install the Fuse Taps
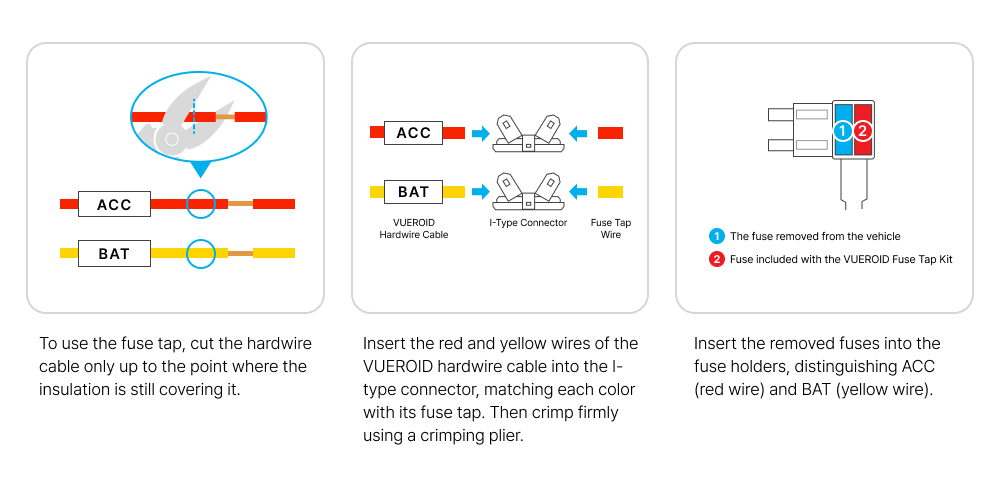
- Cut the hardwire cable only up to the point where the insulation is still covering it.
- Insert the red and yellow wires of the VUEROID hardwire cable into the I-type connector, matching each color with its fuse tap. Then crimp firmly using a crimping plier.
- Remove the selected ACC and BAT fuses using the fuse puller provided in your vehicle’s fuse box or needle-nose pliers. Each fuse tap contains two fuse positions: Original vehicle fuse and Dash cam protection fuse.
- Install the removed vehicle fuses into the fuse holders, distinguishing ACC (red wire) and BAT (yellow wire). Then install the included 5A fuse, or a fuse rated 5A or lower, for dash cam protection.
- Insert the ACC fuse tap into the ACC fuse slot, and the BAT fuse tap into the BAT fuse slot.
- Double-check that both fuse taps are fully seated before proceeding.
Step 6. Verify the Installation
- Turn the ignition ON.
- The VUEROID S1 should power on normally.
- Next, turn the ignition OFF.
If the installation has been completed correctly, the dash cam will automatically switch into Parking Mode, confirming that both the ACC and BAT connections are functioning properly.
Step 7. Adjust the Camera Angles
Once the installation has been verified, adjust each camera for the best recording angle.
Front Camera
Adjust the camera so the horizon is level and only a small portion of the vehicle’s hood is visible at the bottom of the image.
Rear Camera
Tilt the rear camera high enough to minimize the vehicle’s rear body appearing in the recording.
Interior Camera (Optional)
If your system includes an interior camera, make sure its light sensor remains unobstructed. Blocking the sensor may cause Night Vision mode to activate unintentionally.
Installation Complete
Secure any remaining cables with cable ties and electrical tape, then reinstall all interior trim panels.
Your VUEROID S1 is now fully installed and ready to provide automatic protection while driving and parked.
If you have any questions during installation, please contact the VUEROID Customer Support Team for assistance.